Progress...
...is slow. Still, I'm brushing up on my stand up comics today while I work on my 3 lines of running stitch for the cartidge pleated skirt. And it is rather relaxing to just sit on the couch and stitch.
I decided to line the skirt with the first fabric I bought for my courtesan gown (yes, i'm on my third choice now). Its a mauvey-red with purple floral crap. I figured I'd never find another use for it, and it actualy does make a decent lining. It adds a lot of weight, which hopefully means nice drape and making the practice more similar in weight to my real dress, so my practice is more applicable... Here's the fabric, gurgi loves to get in my way when i'm trying to lay massive amounts of fabric flat on my very limited floor space:

fabric--this is where gurgi plopped himself right on the bit of fabric I was trying to measure and mark for pleat stitches. Silly pup--his evil eyes are showing his true colors.
Detail (for me to remember) of the skirt:
1) 3 panels, 58" wide at 53 inches long (plenty of lengh since I dont know how much extra I need for cartridge pleating "poof" and foldover.) I figure based on how much I have to hem this skirt I will know how long to make my real one to conserve as much fabric as possible...
2) lining and dress fabric are sewn together right sides together at the top/waistband with a 2 1/4" hem. When turned right sides out, this will mean the skirt will be 4 layers thick in the area getting cartridge pleated, and thus should make for a fuller gather and more body.

hem--sorry, crappy pic
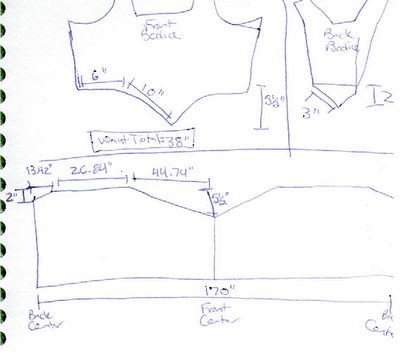
3) I cut dips out of the top of the waistline that (hopefully) are in rough proportion to where my dips fall naturally in the bodice. The total skirt is 170" circumfrence, and the waist is 38". I worked the dips like this:

skirt dips--hopefully this math works for me, or there will be an ungodly amount of seam ripping. Love my sketch, dont' you? ;-) Its here so I can't lose it.
In other news, I have drafted some blackwork patterns I think I will use on my camicas. I was just gonna use other people's stuff, but then i decided to be creative. ;-) Hell, I've got time....
The skinny swirly one is for the neckline, and the more ornate one is for the wrists. The wrist one is loosely based on an example of Italian blackwork I found on DragonBear.
I may tweak a bit more, but I'm sorta fond of these:

blackwork
I decided to line the skirt with the first fabric I bought for my courtesan gown (yes, i'm on my third choice now). Its a mauvey-red with purple floral crap. I figured I'd never find another use for it, and it actualy does make a decent lining. It adds a lot of weight, which hopefully means nice drape and making the practice more similar in weight to my real dress, so my practice is more applicable... Here's the fabric, gurgi loves to get in my way when i'm trying to lay massive amounts of fabric flat on my very limited floor space:

fabric--this is where gurgi plopped himself right on the bit of fabric I was trying to measure and mark for pleat stitches. Silly pup--his evil eyes are showing his true colors.
Detail (for me to remember) of the skirt:
1) 3 panels, 58" wide at 53 inches long (plenty of lengh since I dont know how much extra I need for cartridge pleating "poof" and foldover.) I figure based on how much I have to hem this skirt I will know how long to make my real one to conserve as much fabric as possible...
2) lining and dress fabric are sewn together right sides together at the top/waistband with a 2 1/4" hem. When turned right sides out, this will mean the skirt will be 4 layers thick in the area getting cartridge pleated, and thus should make for a fuller gather and more body.

hem--sorry, crappy pic
3) I cut dips out of the top of the waistline that (hopefully) are in rough proportion to where my dips fall naturally in the bodice. The total skirt is 170" circumfrence, and the waist is 38". I worked the dips like this:

skirt dips--hopefully this math works for me, or there will be an ungodly amount of seam ripping. Love my sketch, dont' you? ;-) Its here so I can't lose it.
In other news, I have drafted some blackwork patterns I think I will use on my camicas. I was just gonna use other people's stuff, but then i decided to be creative. ;-) Hell, I've got time....
The skinny swirly one is for the neckline, and the more ornate one is for the wrists. The wrist one is loosely based on an example of Italian blackwork I found on DragonBear.
I may tweak a bit more, but I'm sorta fond of these:

blackwork


0 Comments:
Post a Comment
<< Home