I went to the bead store in the city yesterday. Yes, the one that our trio didn't make it to last time round. And just to redeem myself, my concerns were correct--all parallel parking. None too fun on a hill and in a stick shift with no power steering. Still, I braved it and ventured forth. It was an entertaining store, and they had quite the selection, but it was pricey and my heart wasn't in to it at that particular time. I left with 2 strands of pewter colored glass pearls and some matte czech glass beads in the darkest red I could find. Then I went to the famed "trim" store and got some cheap plastic pearls in ivory along with the gold cording that's currently functioning as the drawstring on my purse.
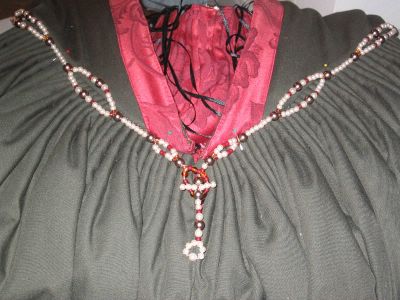
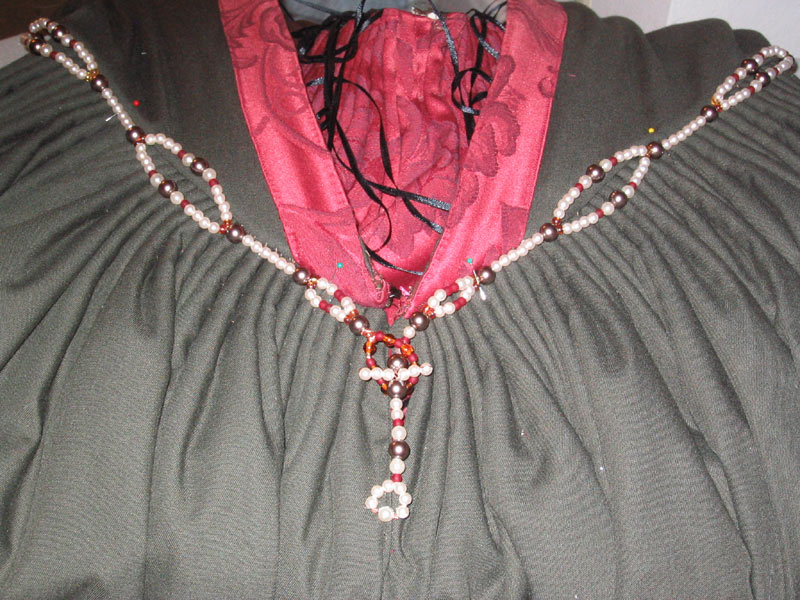
Stringing my pearls yielded this girdle. I didnt' put much design thought into it actually, and I didn't have the peach pearls I was so keen on (they were too $$ in the store, but now I kinda wish i'd just splurged). Still, I think its nice enough, and I will try to make a fancier one for my orange dress. Its strung on copper beading wire, and I'm not really sure what happend with that front claspy bit, but its functional. Kinda religious looking, too, I guess. I attached the girdle to the dress at some key locations so that it would conform to the points (beth's idea). The pic has them pinned down, rather than sewn. I got impatient.
girdle
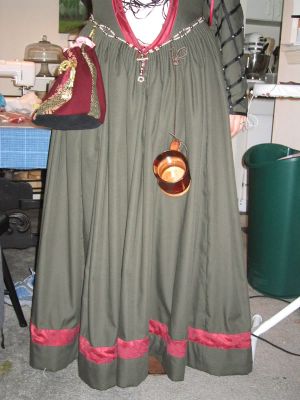
Oh, and since I was fiddling with the waist of my dress, I attached the utility loops to carry my accessories. Here's a pic of them in action with my purse and cup. I'll likely add a flag fan to that group, and I'll still have one extra loop in case I think of anything else. Oh, and in this pic you can see the way the hem turned out, and the beginning of how the sleeves look with pearls on the intersection. I'm calling this done. Sure, there are pearls left for sleeves, but that is a carride chore for when hubby drives, which is fairly often. I have NOT one single fiddly bit left. This dress is FINITO!! Tomorrow I start working up the orange. Huzzah!
Since I was trying to pull and all-nighter last night, I thought I'd keep myself awake by sewing. I decided to tackle the aforementioned fiddly bits and also start on the bag/purse for me to carry my goodies around the fest like a lady.
Now, I don't really know, well, anything, about venetian purses. I vaguely remember the topic coming up at some odd time or another, and there is evidence of purses, but I have no idea regarding styles thereof. This is where I get to be liberal and artistic. In period, seamstresses would no doubt have tiny little remnants of the lush venetian fabrics, yes? Well, I had some scraps and large swatches of various fabrics I am fond of, and rather than just keeping them to look at, I decided to incorporate them into a sort of strip-quilted bag. The bag is simple: strips sewn together to make a big rectangle, circle with interface stiffening for the bottom of the bag, light pink tafetta lining (light so i can see whats in there when i take a peek). So basically a glorified pouch with drawstring action. The bonus is that I can use it with both dresses. bag The only fiddly bit I've got left on the green dress is to add some utility loops in the folds of the skirt around the waist so I can carry goodies (like bag, cup, fan) sans hands. Oh, and I might add pearls to the sleeves, but that is most definitely NOT a requirement.
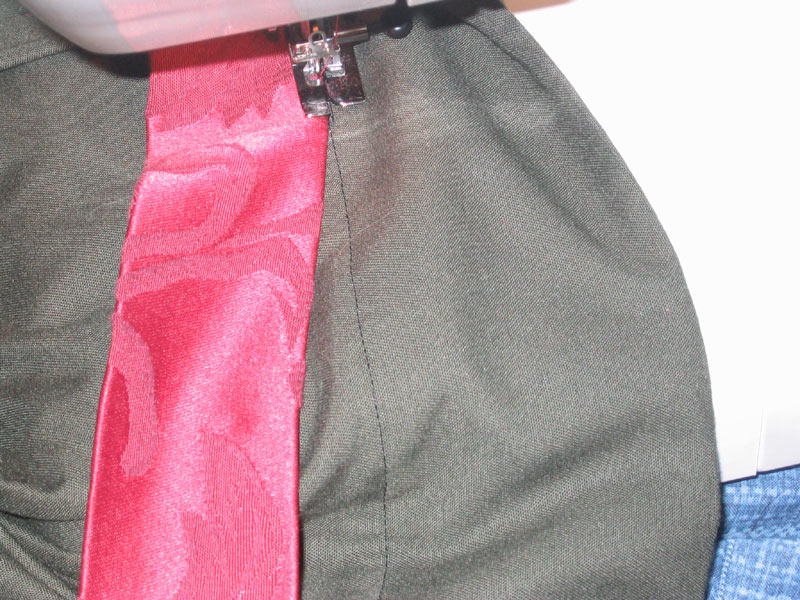
I decided to just do one 2 inch strip of red guard a bit up from the bottom hem of the dress instead of my previously planned wide bottom guard.. Why? Becuase when I hemmed it I was too lazy to cut out excess fabric (and also afraid of cutting in case i screwed up the hem. I ended up with a wide pillowcase hem, which i conveniently covered with the guard. Brilliant. It also adds a nice weight to the skirt bottom.
Ah, how I hate the "fiddly bits." I've got a running list of little, but not-as-inconsequential-as-I'd-like things to do before the green is officially done. Foremost on that list is the hem and bottom guard. Then I've got some loose guard on the bodice to sew down, need to serge the inside of the skirt where I sliced off the lining, so it doesn't fray. Need to cut a bunch of loose threads--particularly the leftover threads of cartridge pleating. Need to sew a couple more hook n eyes on the skirt front slit to keep it from opening. Need to make some sort of pouchy/purse. Need to make pearly girdle to accessorize, and a flag fan. I did, at least, finally finish that dreaded roped petticoat. Man, am I tired of pink. After all my little list is done, I can go onto greener, or oranger, rather, pastures....
Last night, after complaining to Niter that I hadn't sewn all day and being bummed about it, I decided to get off my tushy and fix that problem. So at 12am I started sewing. I finished my sleeves. They are now hemmed on the bottom and trimmed with the thin black grossgrain ribbon around the wrist, and hopefully the right length that the ruffle from my camica sleeve sticks out just so. I might fiddle with putting pearls on the intersections of the ribbon. but i counted, and I don't currently have enough pearls. So that'll wait til i've got a long car trip and someone else is driving. ;-)
Oh, and a shout out to Em! My wonderous sister came over yesterday morning, helped me lace into the whole getup, and pinned up my sleeves and skirt--a very long process. So, that is ready to hem. And on my to-do list for this evening.
And, for a non-stressful story: the only sewing I did this weekend, despite best intentions. Rings on my straps for to tie on my sleeves. Huzzah.
sleeve rings
I actually was motivated enough to mark all over my petticoat for additionaly cording, but i was a dolt and used the "disappearing" side of my fabric pen. So by the next morning when my sewing time came round, my work had abandoned me. Doh!
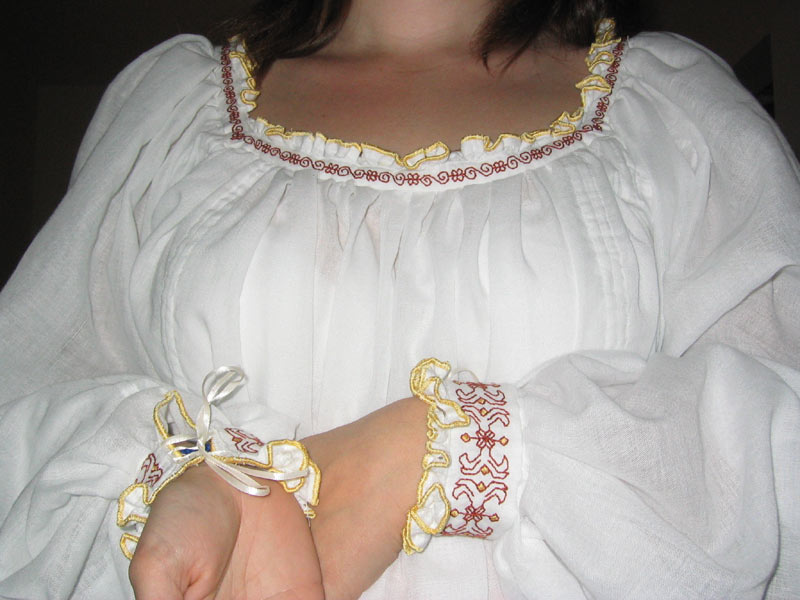
Finished the camica today. Finally. I've been letting it languish, cuz i had a secret fear that the neckline band i embroidered for hours and hours was too small. However, I think it turned out to be a decent size. I coulda made it a little bit wider, but its more than functional as is. I love the way my curly edging turned out, even though manipulating it around the sewing machine was an asspain. But it looks just like that portrait from waaaaay back in my blog. Finally.
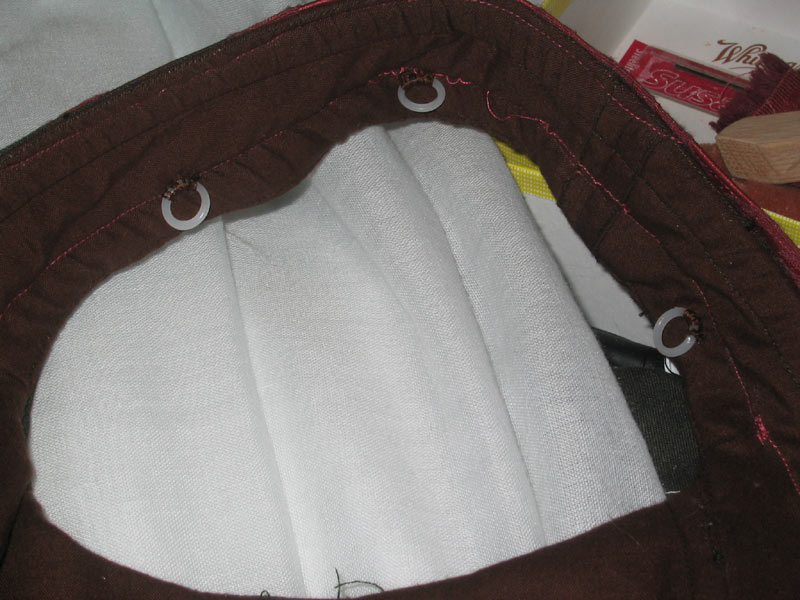
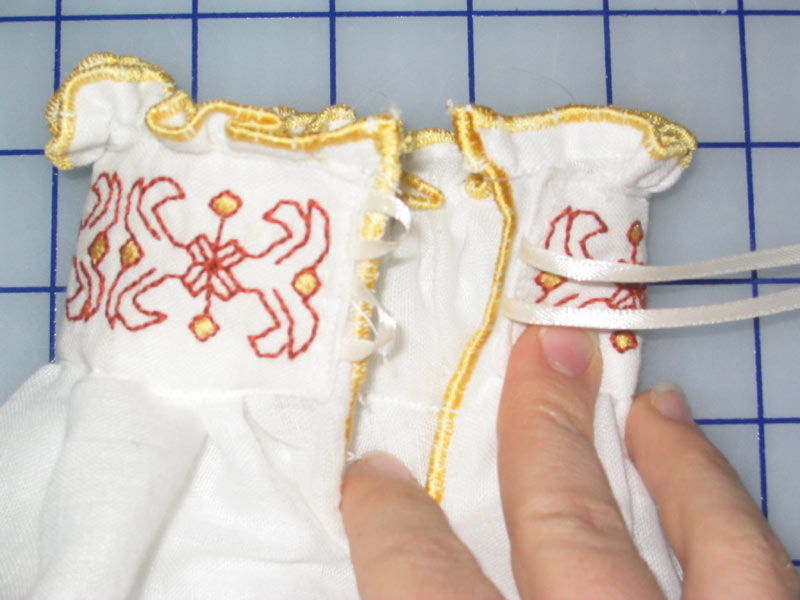
And how did I end up working the wristycuffs? They had to be expandable so i could get my chubby little hands through. And i wasn't in the mood for eyelets. I ended up with ribbon loops on one side and loose ribbons on the other. Works for me, and I think its kinda cute.
I was planning on doing a straight stitch in the rust color around the edge of the cuffs to make a border and cover the machine stitiching. But I'm also kinda liking it sans border. Thoughts, anyone?
Also, I managed to attach the ribbons to my sleeves for attachment. They won't be this long, and they won't remain loops, but I need to make the points of attachment on the dress, and i'll do all necessary trimming then. Each ribbon will also get a cutesty little pearl at the bottom.
Here are both sleeves completed (except for bottom hem) on the dress. Notice how i gracefully lift one arm to show off the camica poof ( great idea, beth). Also note the curly edge of my camica sleeve peeking out from the bottom of the green sleeve. I'm gonna hem the sleeves to the ideal length for this. I think its cute, like a ruff, and I didnt' even have to make a real ruff. Mwaaaah-ha-ha-ha-haaaa.
And what happens when i wear my dress sans sleeves with the new super fabricy camica? Well, the extra sleeve fabric is so much that it covers my hands. I fix that by pulling said sleeves through the straps and looking a little Dangerous-Beauty-esque. Functional. And I really did see this in a portrait on Realm of Venus on the camica page. Notice my loyal hound:
All that's left are the sleeve attachments and hem. Before I hem I need to complete the roped petticoat. So, petticoat is my plan for tomorrow. I've also got accessories to do: fan, veil?, partlet, girdle, purse, but i can do those a bit more slowly, and they're not ABSOLUTELY necessary to wear the dress. ;-) SOOO close to done. sorta.
Finished the second sleeve tonight. It went much faster than the first. I only buggered up one part of the ribbon, right in the center, and was unwilling to rip in from all the edges to fix it. Clear nail polish did the trick. and you can't tell. Its in the pic. You'll never find where! Anyway, I attempted to mirror image the sleeves as precisely as I could (niter should love this), and I'm sorta proud of the (near) symmetry. hehe. And doesn't this look like part of a green spiderman costume?
I finally started sewing the neckline blackwork band onto my camica. Finishing my sleeves inspired me, as I need the REAL camica to do the poofing through the pearly slits. Huzzah!
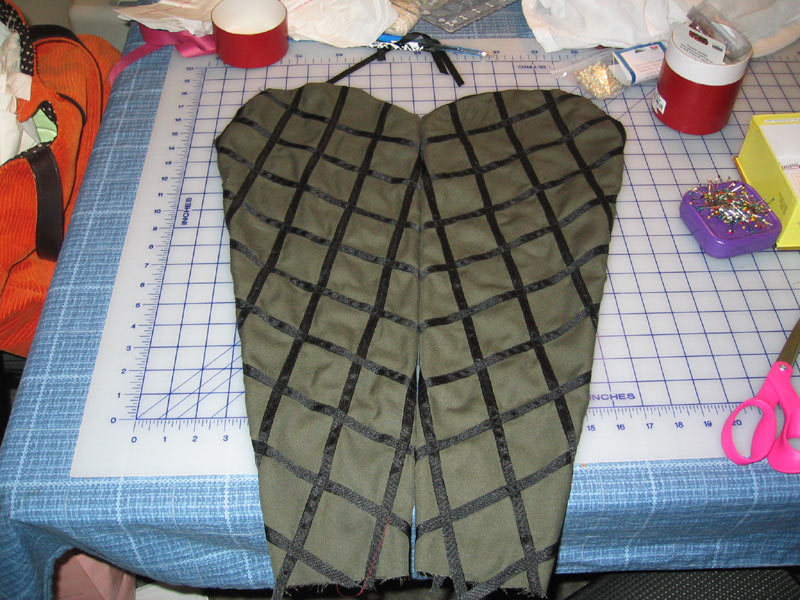
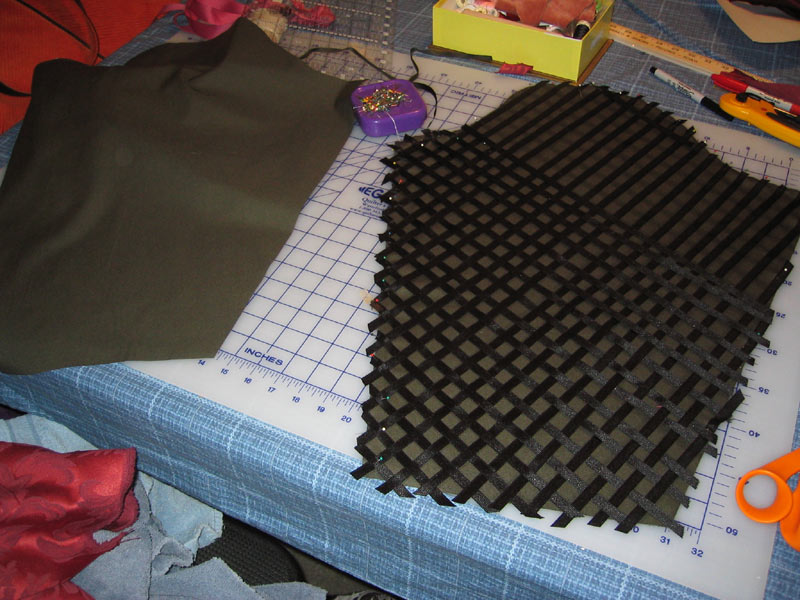
Tonight I worked on the lattice for my left sleeve. Honestly, once I got into it, the process wasn't that hard, and it only took a couple of hours. One nights work/sleeve is bearable, i think. And I'm very pleased with the result:
I will have to attach ribbons and whatnot to tie the sleeves on (right now its merely pinned). And i need to hem the wrist part, but that also will wait until i've got it tied on so i know the length better. Note below, that my grids do not line up perfectly along the inside of my arm seam. I am far to lazy to do THAT much math. Just be happy the lines are straight, niter! I also stole the sleeve opening idea from Beth, and tacked the sleeves together along this seam with pearls down the length. This is for my camica to poof through. This is my old camica, so there's not nearly as much fabric to pull through. I expect this look to get better when I finally finish gathering and butting cuffs/neckline on my camica.
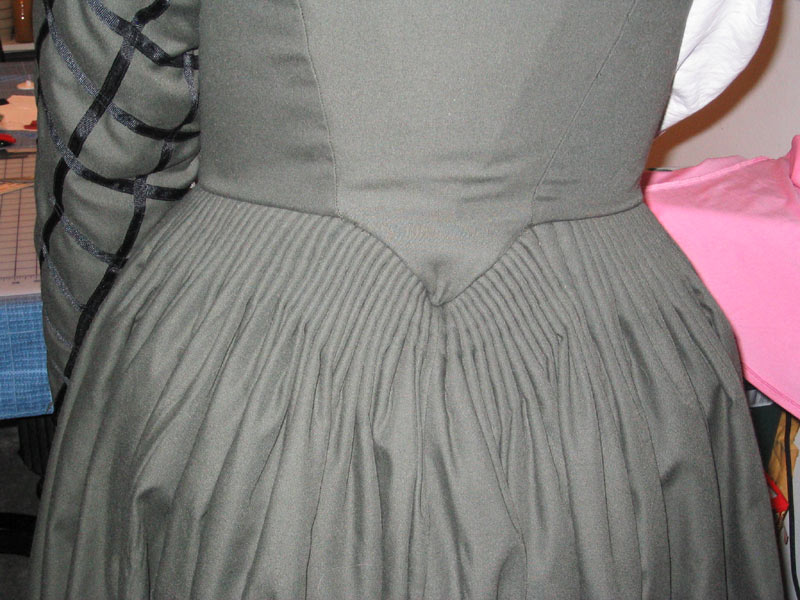
And for buttpucker giggles. A better quality pic of what my buttpucker is doing now. Still there, still annoying, but no longer poking my arse, and I'm at a loss to fix it. I honestly believe its a design flaw. My point is so sudden in the back that I think it makes too much stress. On my next dress, i will make the point slope much more gradual (a la Beth's dress), and I really do think that will fix the problem. This was supposed to be a learning experience, afterall.... buttpucker
Sounds like an infomercial. However, its exactly what I did to my dear green "practice" dress today. I've been concerned with the excessive weight of the dress for spring/summer use. It was formerly checking in as a heavyweight at 7.2 pounds. Today I cut out the flirty, red skirt lining, and the dress was magically slimmed by 2.4 pounds. Thats a full 1/3 decrease for those of you up to doing the fractions....
The dress is wonderfully light in my hands now, and much easier to maneuver around the sewing machine. It also means i've got oodles of red fabric just in case I need it for any other projects--sleeves, pouch/purse, flagfan? The only catch is that now I have to be careful about lifting my skirts when I wear the dress, unless I want to expose my picnic like checkers on the inside of the green fabric. Still, I think that trade is worth the heat regulation. Now the dress is a slim 4.8 lbs. Not counting extensive undergarments, of course.... For a 10 second scissor-induced-diet, that's not bad at all!
In other news, I've been working on ironing out some of my fit issues. Primary on the list is that annoying butt-pucker. Today I removed that part of the cartridge pleated skirt (goodbye hard-won handstitching, I shall be doing more soon, i suppose), and have removed about an inch of the boning to relieve some of the pressures and strain in that area (not to mention keeping said boning from poking me immediately above my, um, crevice). I also found what I think is the source of my problem--the lining and outer fabric were not the same width, so it was making "weirdness." I was hoping all that would fix it. Unfortunately, mr. pucker didn't go away completely, though it is undeniably better than it was. Sorry for the horrid picture quality, but hubby wasn't home tonight, and I'm not so good at the yoga mistress thing (as I think we've already covered). I especially like how it looks like there's a toothbrush stuck to my bum. buttpucker. ooh, it sounds so dirty..... I really am at a loss as to how to fix this now. But its no longer uncomfy, so I may just suck it up and deal. Unless my accomplices can help me the next time i see them. chuckle. Up for night-before-event-sewing, anyone? The next issue is getting the front "slit" to come together nicely at the point of the V, and to hide that skirt slit in the front. Hook N Eye closures are wonderfee for both issues. hooks and eyes help hold the skirt closed, even when the dress isn't laced. I'd say that's effective, wouldn't you?
I also worked on pinning the ribbon lattice to my sleeves. I decided to go with a larger grid than in my original pictures. For sanity as well as for ribbon-conservation. I've only got one sleeve so far, and its only pinned, not sewn, but I'm liking this look a lot. Hopefully will be able to sew this soon. Unfortunately, tomorrow night is out of commission for me, as I have to attend my little sister's concert. Note that this little lattice scares me. I just know its gonna move all around and be an asspain to sew. Simple. Hah. sleeve
My green fabric has a black checkered pattern on one side. I've decided to see what happens if i take advantage of this on my sleeves. Note that I'm planning on just doing straight sleeves that tie on, and will pull the camica out between sleeve and dress. I will most likely try a dressier style sleeve on my orange dress, but this is my "dress down" venetian, so I'm going simpler.
I went to the fabric store and bought ribbon. My original plan was to buy red/pinky ribbon to match the guards on my dress, but pitiful fabric store did not have that color. So I went safe and bought black. I decided to sew a lattice of the ribbon onto the green fabric following the existing checked lines. This is what the lattice is looking like so far:
I dunno. The effect is cool, but its kinda busy, as the existing grid is kinda small. I will think on it some more. I suppose i could do the same thing in a larger grid (more green space) on the nonpatterned side of the fabric.
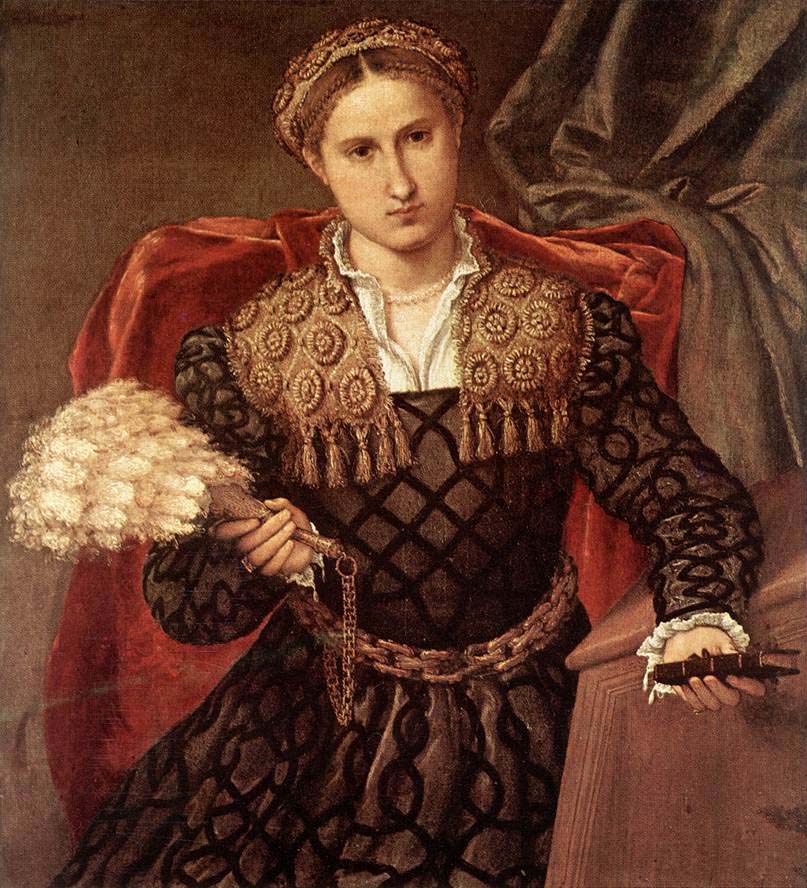
Of course, I don't even know how period the crisscross pattern is. The only evidence I can find is this, from 1540's:
Okay, so that's some premature celebration, since I still have to finish the camica, petticoat, sleeves, partlet, girdle, hemming....But at least I have a pretty dress that all can look at. Okay, I suppose the pretty part is a tad subjective, but if you disagree, you're wrong. ;-)
Anyway, I've been thinking about how to wear my split front dress, as the layering options can be difficult if one wishes to wear a corset and a camica. I know that typically the camica is worn immediately under the dress so the fabric shows on the front split. But I've also seen evidence that there were sometimes more intricate things under the ladder lacing. Like this one:
Sort of like a stomacher?
Since my corset is of a decorative fabric, I'm thinking it could work in the above fashion, and it might solve some of my layering issues. What do you think?:
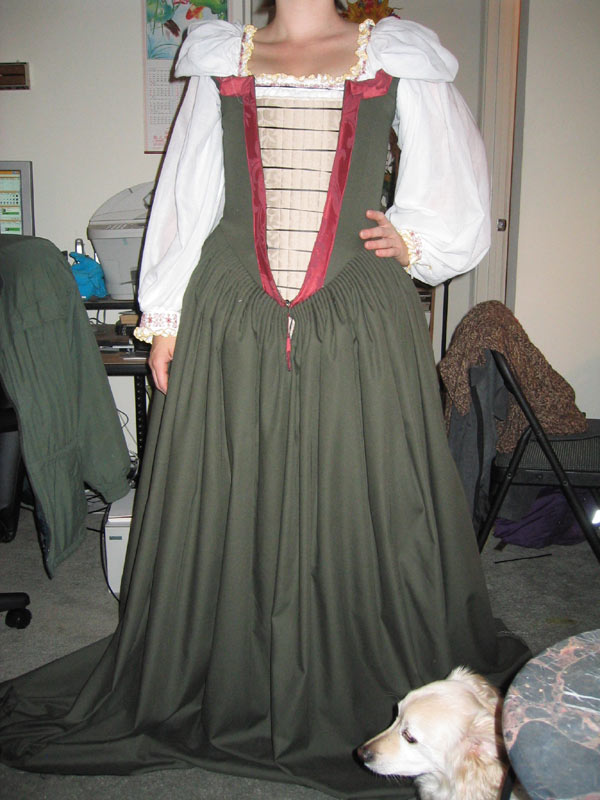
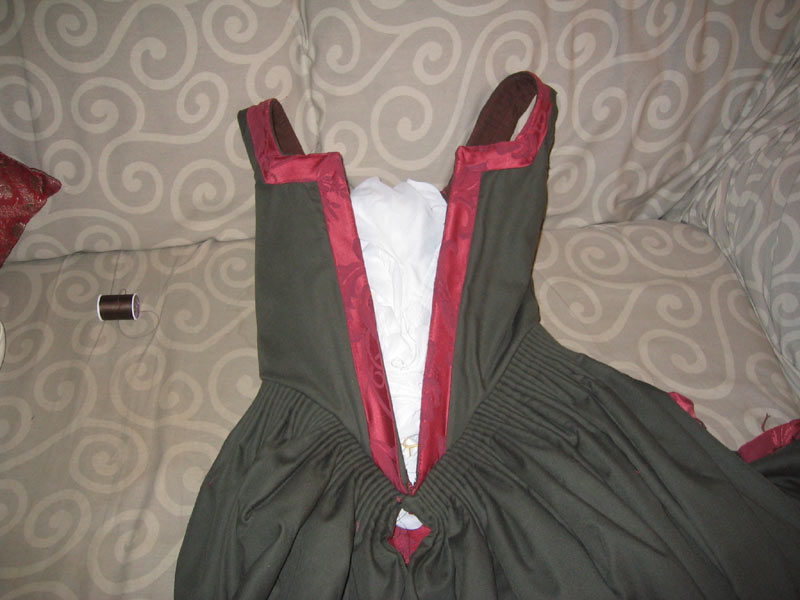
Front view. I folded up the bottom hem for shits and giggles so I could get a better idea of what it'll look like after hemming. So really, this is pretty much what it'll look like finished (plus sleeves). I might add a second guard to the bottom a bit above the wide bottom one. Depends on fabric availability and motivation. I think I've decided not to add the second guard to the bodice for now. This is based mostly on laziness, but technically there were more votes to not add it anyway! ;-)
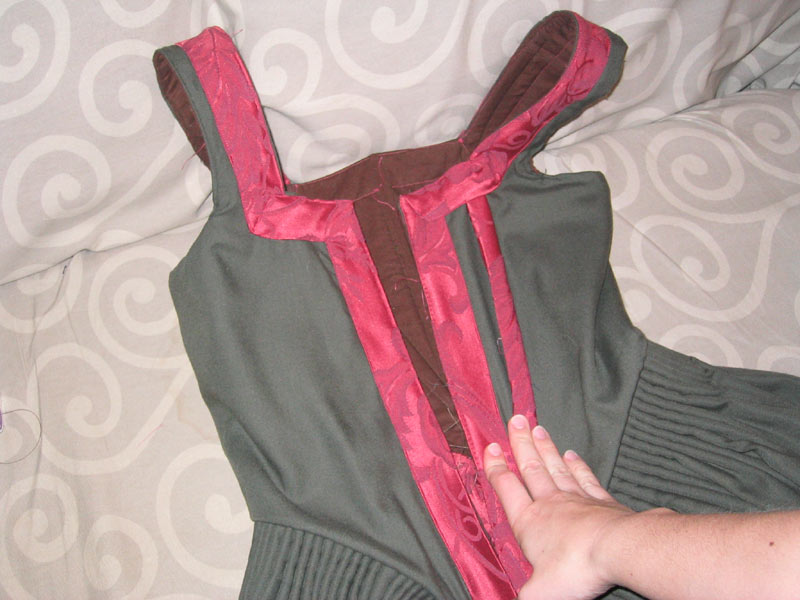
Here's the back. I thought about adding guards down the side back seams but then thought better of it. Note that my collar guards aren't as symmetrical i like, but i'm dealing for now. I figure I can't see it, and if it really bothers me later I'll fix it. ;-)
And now for the super nitpicky stuff. This bottom bothers me right now. The skirt slit does not come together right. I'll play with the slit (chuckle) and try to loosen the gathering strings so it comes together more attractively. If not, hook and eye will be the answer...
Here is the butt. It is giving me issues. The strange pucker on the point gets to me. I think its an artifact of the weight of the skirt and the way one must attach the cartridge pleating. even the strong boning down the middle of my back can't keep this from puckering in. The outcome is that its poking me right above my buttcrack. Yes, I know that is graphic. Sorry. But I welcome advice on how I might go about fixing this? stupid butt
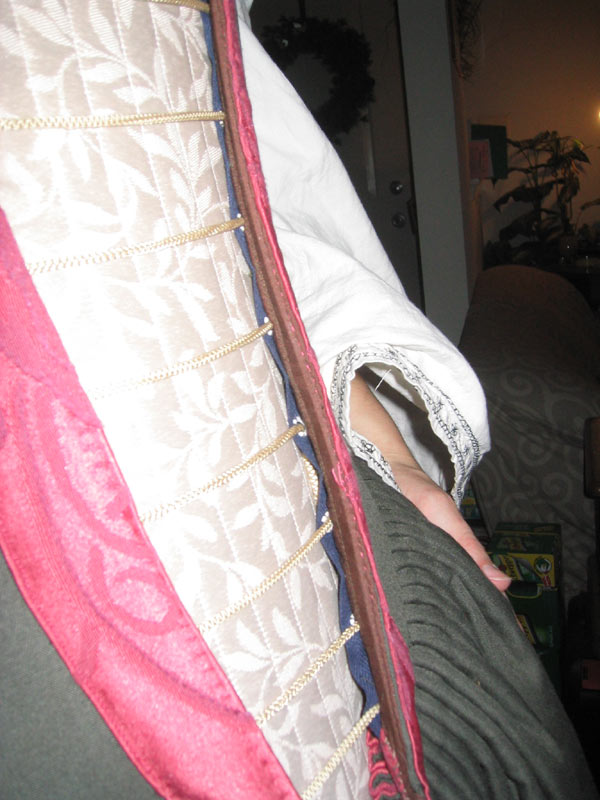
And my other nitpicking. Because I attached the lacing strips behind the egdge of boning on the bodice, I'm finding that the very edge has a tendency to bend out, so if you look form the side you can see in. I don't like this. I may have to sew on some ribbon to lace through secondarily just to hold down this edge. Something that can wait and isn't a huge issue, but I will get around to it eventually. nitpick
Well, as promised, I worked on attaching the skirt to the bodice. That is now finished, though I'm unhappy with some aspects of it. I'll have to talk about that on a later post where i have a pic of me in it....
For now, here is the mighty....interesting...handsewing of the skirt to the bodice bottom, and also a good shot of how i cheated for the lacing inside. Ribbon strip that was pre-eyeleted. I had intended this only for practice lacings, but I'm feeling lazy, and no one can see this when I wear the dress. Its inside, afterall....
lacing/cartridge
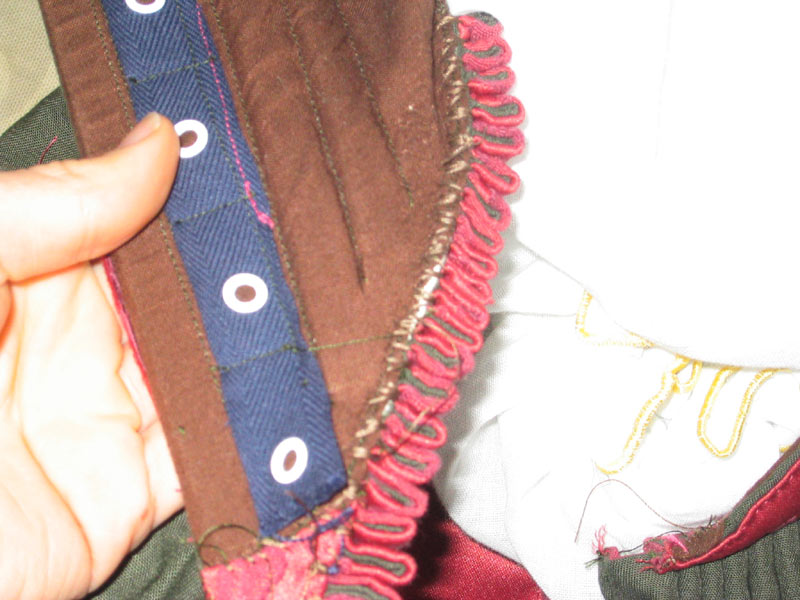
I was too lazy to lace it on this evening, but below's a pic of my progress thus far. The bodice, as you can see, is attached. And I cut guards from my red floral fabric. They were 2.5 inches wide before hemming, so I figure they're around 2 now. In retrospect, I figure i could've matched the floral patterns, but its probably more period not to, since they would've been scraps anyway.
I sewed as much on with the machine as was possible (around the boning) and then made sorry attempts at handsewing the rest. The handsewn bits amuse me. Especially when seen next to the machine stitches. hehe.
And here is my conundrum open to popular vote. I now have one guard. Shall i leave it as is, or add a second thinner guard a la this photo? I'm waiting to tally answers! hmmm?
Yes, I've been blatantly neglecting my dress diary for sometime. I apologize to any "regular" readers that I may have disappointed during my time off. I was sick of handsewing the skirt onto the bodice, and had to put away for quite sometime. I did use the time to alter some cute clothes I picked up on shopping trips--"tall" pants were on sale (i usually buy "short"), and rather than miss out, i figured i'd buy em and hem to my short legs. I also finished the blackworking for my camica, but still need to attach the bands to the camica.
This weekend I had my wisdome teeth removed, and I figured that the painkillers could take the edge off of jaw pain AND handsewing....
With this in mind, I decided that the original way that I was attaching the skirt was more work than I cared to do and was overly complicated. I ripped it all out and decided to attach the cartridge pleated skirt the old fashioned way (like this). I think I might have made more work in the end, when you account for all the seam ripping. Oh well, I never said pain killers made me LOGICAL....
I also started cutting and attaching guards from the red floral fabric to put on the bodice. Tonight I'm working to attach the skirt to bodice and to attach the guards to bodice. No pics yet, but as soon at its reasonably together, I will post some.